vuepress 搭配 vuepress-theme-hope 主题搭建个人博客经历
原创2021/6/27大约 3 分钟
初始化 vuepress
mkdir yourBlogName && cd yourBlogName #创建一个文件夹并进入,也可以直接在创建用vscode打开该文件夹
npm init #用npm初始化,也可以用其他的
npm install vuepress -D #安装vuepress
npm install vuepress-theme-hope -D #安装vuepress-theme-hope主题
npm install #最好npm install一下,防止包丢失
修改 package.json 文件
添加以下代码
"scripts": {
    "dev": "vuepress dev docs",
    "build": "vuepress build docs"
}
第一篇文章
1、在根目录下新建 docs 文件夹
2、在 docs 文件夹下面新建 readme.md 文件(这是作为首页)
vuepress-theme-hope 主题配置
1、在 docs 文件夹下新建.vuepress 文件夹
2、在.vuepress 文件夹下新建 config.js 文件
具体内容:
const { config } = require("vuepress-theme-hope")

module.exports = config({
  // your config here
})
#必须要按照以上写法,不能使用vuepress官方文档的写法
#具体配置项参照:https://vuepress-theme-hope.github.io/zh/config/
打包
1、运行npm run build
2、由于我在配置文件中设置的是 dest: 'public', 所以打包完成后根目录会出现一个public文件夹,里面是打包后的内容,点开index.html文件会出现样式丢失,这个不用管,因为用的是相对路径,所以只有上线部署后才会有样式。
部署
我是部署到github上的,由于我不是第一次部署,所以仓库名已经被占用了,我用的是另一个仓库
但我想在我的github博客仓库中设立两个分支,一个分支存放我博客的所有内容,一个分支存放打包后的页面
思路:主分支master存放打包后的页面,另一个分支存放我博客的所有内容
在根目录下新建一个deploy.sh文件
内容
#!/usr/bin/env sh

# 确保脚本抛出遇到的错误
set -e

# 生成静态文件
npm run build

# 进入生成的文件夹
cd public
# 如果是发布到自定义域名
# echo 'www.example.com' > CNAME

git init
git add *
git commit -m '发布'

# 如果发布到 https://<USERNAME>.github.io
# git push -f git@github.com:<USERNAME>/<USERNAME>.github.io.git master

# 如果发布到 https://<USERNAME>.github.io/<REPO>
git push -f git@github.com:xiezhenghua123/blob.git master #这是我的仓库名

cd -
注意:这个文件必须用git打开才能正常运行
写好文章后运行这个文件,命令:./deploy.sh
运行过程中,项目会自动打包,然后上传到github博客仓库中的master分支
github上需要操作的步骤:
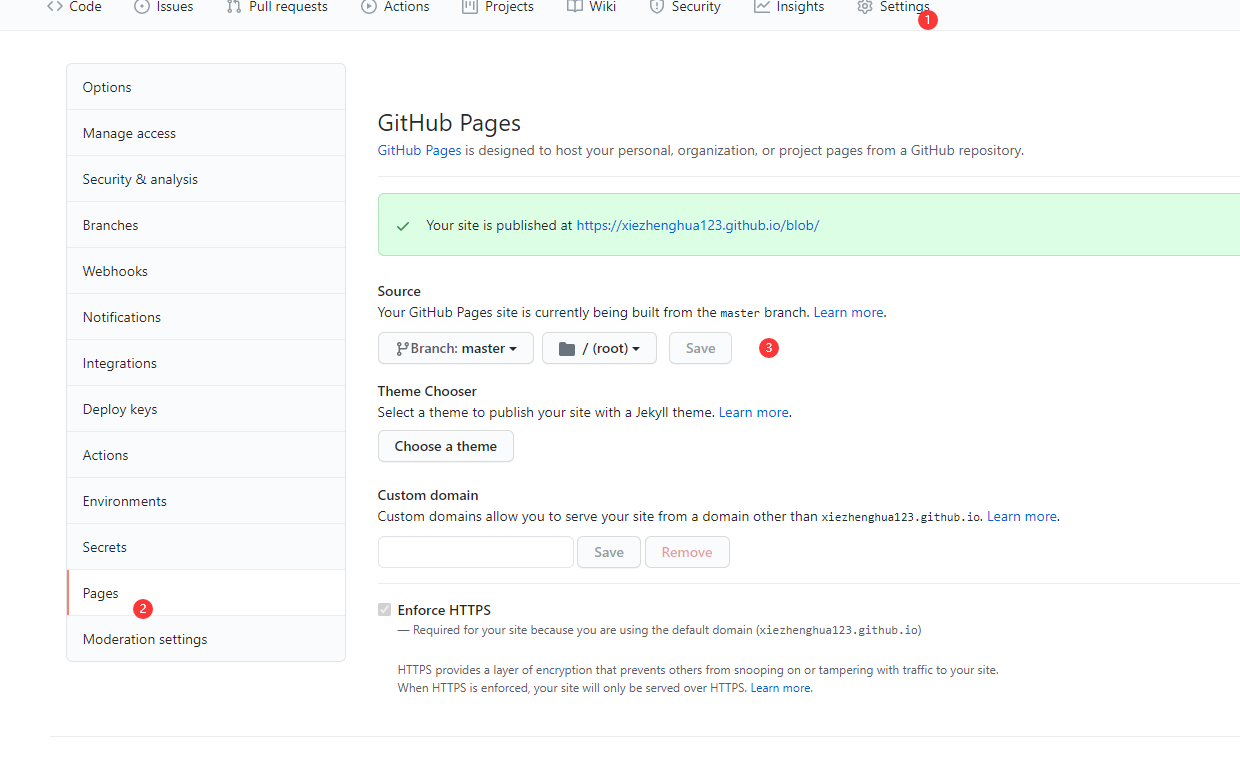
完成以上步骤,博客就能访问了。
为了防止本地仓库丢失,我们需要把整个博客文件上传到github仓库上的public(名字自己定)分支
git checkout -b public #本地新建一个public分支
git add *
git commit -m 'xxx'
git push -f --set-upstream origin public
写好文章后发布的完整步骤
./deploy.sh
git checkout -b public #本地新建一个public分支,只需要运行一次进行,以后不要切换分支
git add *
git commit -m 'xxx'
git push -f --set-upstream origin public #运行之后,以后就只要git push就行
博客发布流程已经换成Github Pages